

CentOS is a free and open source operating system. CentOS is actually used for building servers, mainframes, workstations etc..So today, I will guide you with some of the basic steps that you need to do before you build a working server on CentOS 6.
You can simply set up Nginx, Apache, Lighthttpd or any other webserver that you want to set up, But his practice is to tweak and apply some basic security protection on your server and make it real private. For example if you want to modify the default root login,change default SSH port and so on.
These initial CentOS server setup is strongly recommended. However the decision is up to you. If you own a dedicated server or a VPS and so you can follow this guide now.
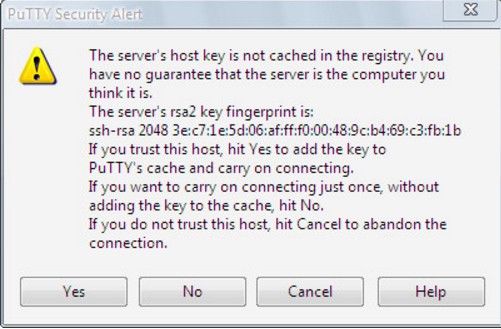
Step 1 – The first step is that you have to login to your remote server through an SSH connection. You can use either Putty in Windows or the Terminal if you are using a Mac or Linux. Then you will have to login as root user. If you are logging in for the first time, then the Putty will ask you to cache the host key of the server in the registry. Now you will see the following kind of window. You don’t need to worry about it, just click on Yes.
Step 2 – Change default root password
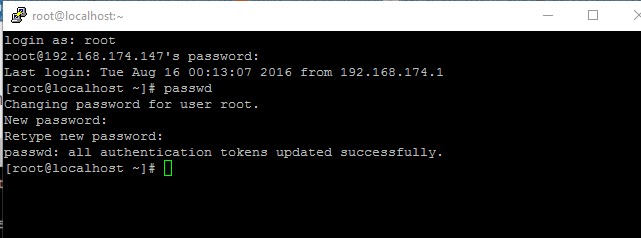
Sometimes when a server or a VPS is created, a random password is generated by the provider’s management software. It will be good for you if you change the password to something that you can remember easily, but it should be hard enough to break. To change the root password of your CentOS system, you can use the below command:
passwd
Then you will be ask to enter new password twice.
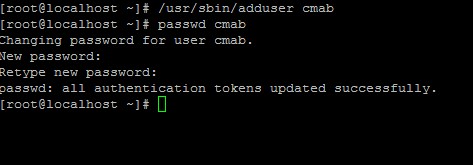
Step 3 – After completing above two steps now you need to create a new username as you have to disable the Root login later also Root is a very common user name so it will be very easy for the hackers to guess this username so you will have to disable the root login and create a new username. This is just like administrator or admin if you are using Windows. You can use the command below to create a new username:
/usr/sbin/adduser newuser
Note: change “newuser” above with your own new username. In this example I use my name “cmab”.
Then enter this command to setup password for that new user:
passwd newuser
Step 4 – So now you have to setup root privileges for that user. so once you logged in to your server using that new user you will still be able to perform any root only tasks. To do that simply issue this command:
/usr/sbin/visudo
Then look for the line / section called:
# User privilege specification
root ALL=(ALL) ALL
0r in different CentOS release it may also like this:
## Allow root to run any commands anywhere

root ALL=(ALL) ALL
Then add this line right after the root line:
## Allow root to run any commands anywhere
root ALL=(ALL) ALL
newuser ALL=(ALL) ALL
It should look like this:

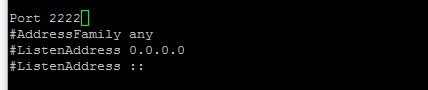
Step 5 – Change SSH default port and disable root login,To perform this action, you have to edit the “sshd_config” file. This is the main configuration file of SSH service in the CentOS server. You can either use the Nano or vi editor to edit it. Personally, I am using the Nano editor right now.
nano /etc/ssh/sshd_config
Then you have to enter the following line:
#port 22
You have to remove the # symbol and change the default port that is 22 to any number you want between 1025 and 65536. I am using port 22000 as an example.
port 2222
The following kind of screen should appear now:
Next, also find:
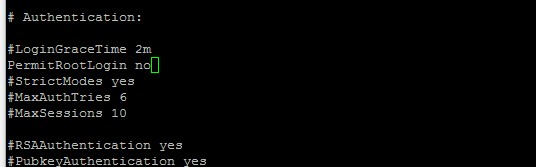
#PermitRootLogin yes
Remove the # symbol and change yes to no
PermitRootLogin no
Screen will look like this:
Next, find this line:
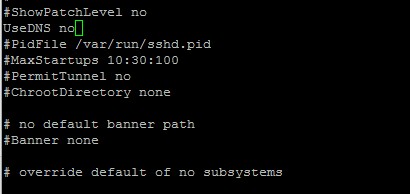
#UseDNS yes
Remove the # symbol and change yes to no
It may look like this:
Now proceed to the next step:
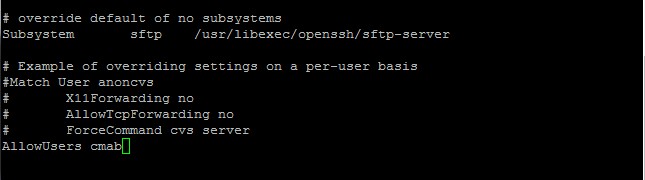
Step 6 – Give privileges to the newuser to login to your server through SSH. For this purpose, Simply add this line in the very bottom of that file:
AllowUsers newuser
Of course you have to replace “newuser” with your own username created in the step 3 above. Example:
Once done, hit Control+O to save then Control+X to exit Nano editor.
Step 7 – Now you have to reload the SSH service. To make sure the new configuration is used by the service, simply reload SSH by using this command:
/etc/init.d/sshd reload
It should return with the OK message.
Step 8 – Now all of your basic CentOS settings are done, Give it a try! To make sure all the settings you defined in the SSH config file really works. Launch another Putty and then login using the new username, password and SSH port..
After the changes, you’ll see your new username instead of root:
So this is all you have to do before building a working server on your CentOS system.Please Give your opinion below if you experience any issues or to discuss your ideas and experiences.