
Today we will see how to add new site and setup Apache virtual host file on CentOS server.
If you want to add several websites with different domain/subdomains, then you must know that adding and editing virtual hosts file on an Apache-based server is very useful. so let’s add the first new domain name to our Apache based CentOS server.
prerequisites
Before proceeding further here are some prerequisites.
- CentOS server with any version,my playground server is CentOS 6.5.
- Basic skills and know how to use putty
- Your server should have some necessary software to host a website.like Apache, MySQL and PHP.You can check my previous post on how to Install LAMP stack on centOS.
- A cup of coffee and 20 minutes of your time
How to add new site into Apache based CentOS server:
-
Login to your server and follow my previous guide about Basic setup for CentOS before you build a working server. You may follow that tutorial for some basic security tweak on your server.
Run this command to go to the root directory:
cd ~
-
Now we will add new document root directory for the new website. The “document root” here is a directory where you keep all files of your website. For that, you can use below command:
mkdir -p /var/www/domain.com/public_html
or,..
mkdir -p /var/www/domain.com/htdocs
Don’t forget to replace “domain.com” with your real domain name.
In this example I am using “” as my domain Because that is currently unused so I can use it for my testing purpose.
You can use either the “public_html” or “htdocs” as the name of your directory but in this example I’ll use “public_html”. - Give ownership permissions to the user, use this command:
chown -R root:root /var/www/domain.com/public_html

-
Now change permissions for www directory. This is necessary to allow anyone who is visiting your site to be able to access your website. Use this simple command:
chmod 755/var/www
M
It will look like this:

- Create Apache virtual hosts file for the new domain. Now we have to create and configure Apache virtual hosts file to add our new website. In this step we need to edit “httpd.conf” file. Run this command:
nano /etc/httpd/conf/httpd.conf
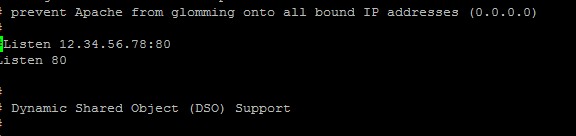
Once Nano editor screen appears, scroll down and find following lines:#Listen 12.34.56.78:80 Listen 80
Make sure its listening on port 80.
Next, scroll down again or hit Control+V until you see this section below:

Now remove the # symbol. So it’ll look like this:
NameVirtualHost *:80
#
# NOTE: NameVirtualHost cannot be used without a port specifier
# (e.g. :80) if mod_ssl is being used, due to the nature of the
# SSL protocol.
This means any IP address going through port 80 will be a virtual host. If your server has more than one IPs, you can simply replace the * symbol with your IP.
Once done, right below that section you’ll see:
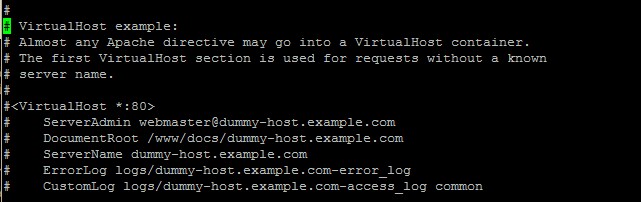
Important things to do:
- Remove all the # symptoms before the <VirtualHost *:80> until </VirtualHost>.
- Change the existing email id at “ServerAdmin” line.
- Change the documents root path “DocumentRoot” line.
- Set up the servers with more elaborate ErrorLog and CustomLog lines.It will be a great option to log issues that occur while maintaining your web server.
Now it will look like this:

That’s it. Now save and exit the nano editor.
- Finally restart Apache service but first issue this command:
apachectl -k stop
That will kill all running Apache processes. Next issue this command:service httpd start or /etc/init.d/httpd
You’ll see the OK message indicating everything’s just fine and your server is ready to host a live website.
- Now we give it a test. Start your web browser type the domain name for which you did all these things. This will open a virtual view of the domain and later with further modifications and add-ons you can absolutely make use of the website which goes live for everyone!