
LNMP stands for Linux, Nginx, MySQL and PHP. In this this article we will show you how to set up working Nginx server to host your websites on your VPS with CentOS 7 version.
INSTALL NGINX
To proceed further login to your server via putty.
Nginx package is not included in CentOS 7 by default, So we have to add Nginx yum repo by giving following command:
rpm -Uvh http://nginx.org/packages/centos/7/noarch/RPMS/nginx-release-
centos-7-0.el7.ngx.noarch.
Next, use the following simple command to install Nginx on CentOS 7.
yum install nginx –y
You can test Nginx is up and running for the very first time using this command:
systemctl start nginx.service
Now enable it to automatically run each time your server is booting:
systemctl enable nginx.service
You can use your server IP to access it, Nginx default page should be seen there.
To check Nginx installed version, you can sue following command:
nginx –v
INSTALL PHP5-FPM
PHP can also be easily installed via YUM, This is a very basic command to install PHP 5 plus its modules.
yum install php php-mysql php-fpm
However, in some cases your apps or scripts (like WordPress and its many plugins) require other PHP modules, so you can simply use the following command:
yum install php php-fpm php-common php-cli php-devel
php-gd php-imap php-intl php-mysql php-process php-xml php-xmlrpc
php-zts –y
Now we need to adjust some php configuration, edit the php.ini file using your favorite editor.
nano /etc/php.ini
Then look for the line with cgi.fix_pathinfo. Remove the ; and set this value to 0.
Once done, save file and exit the editor.
Next, edit php-fpm configuration file:
nano /etc/php-fpm.d/www.conf
and edit the line Listen = 127.0.0.1:9000 replace whit this:
listen = /var/run/php-fpm/php-fpm.sock
Also find the section called “Unix/user group of processes” then change Apache to Nginx.
Once done, save and exit.
Now start php-fpm using following command:
Systemctl enable php-fpm.service
NGINX (CONFIGURATION)
Open and edit the default Nginx (virtual hosts file) configuration file using your favorite editor:
Nano /etc/nginx/conf.d/default.conf
Now add an index.php as the first value of index directive to allow PHP index files to be served when a directory is requested:
Also change the structure from this:
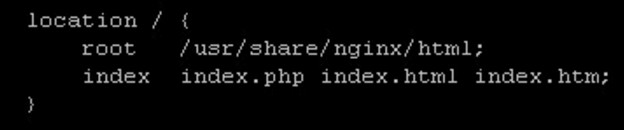
To this:
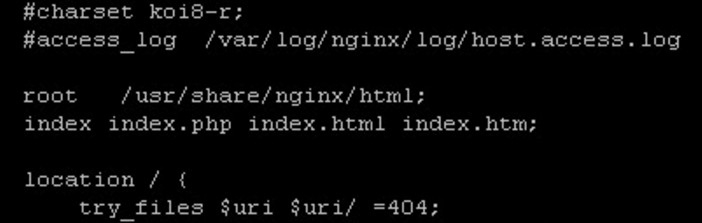
Also change the server_name directive to point to your server’s domain name or public IP address.
Uncomment some lines that define error processing routines especially error 404.
Then scroll down and find a section that says “pass the PHP scripts to FastCGI server listening on 127.0.0.1:9000” un-comment the lines and make changes as follows:
location ~ \.php$ {
    try_files $uri =404;
    fastcgi_pass unix:/var/run/php-fpm/php-fpm.sock;
    fastcgi_index index.php;
    fastcgi_param SCRIPT_FILENAME $document_root$fastcgi_script_name;
    include fastcgi_params;
}
Save and exit and now restart the Nginx services so the changes can be applied:
systemctl restart nginx.service
Now create info.php page to check that Nginx and php-fpm can process any php script:
echo "<?php phpinfo(); ?>" > /usr/share/nginx/html/info.php
Next, open p newly created file into your browser.
INSTALL MARIADB
It is time to install MariaDB server. The command is simple and done via yum:
yum install mariadb-server mariadb –y
Start MariaDB service using systemctl command:
systemctl start mariadb.service
and enable it on boot:
systemctl enable mariadb.service
Configure MariaDB setup like setting up your MySQL root password. Issue this command:
mysql_secure_installation
You will see a serious of questions, Just answer them accordingly. The main important part is to define your root password.
Now test your newly installed MariaDB by logging in as root:
mysql -u root –p
INSTALL PHPMYADMIN
This PhpMyadmin package is not available in CentOS 7.0 default repositories. So you have to add third-party repo like EPEL. Simply run this command to do that:
wget http://download.fedoraproject.org/pub/epel/beta/7/x86_64/epel-
release-7-0.2.noarch.rpm
rpm -ivh epel-release*
rm epel-release*
Now use yum to install phpmyadmin:
yum install phpmyadmin –y
Now to make PhpMyAdmin accessible via web, you have to create a symbolic link from the PMA installation files to your Nginx document root directory using this command:
ln -s /usr/share/phpMyAdmin /usr/share/nginx/html
Now restart php-fpm:
systemctl restart php-fpm.service
That’s it. Now you can test it on your browser:
http://ip-or-domain name/phpMyAdmin and default login page of phpMyAdmin should be displayed.
That’s all about LNMP setup on CentOS 7.
You may also like to know how to set up Debian server with Apache,PHP and MySQL. So, do check it out.
Give your opinion below if you experience any issues or to discuss your ideas and experiences.