

For WordPress users, PHP is an essential coding language. Even if you’re not a developer, you may need to know a little about it to keep your site up to date. Finding even the most basic PHP information for your WordPress installation might be difficult if you don’t know where to search.
Fortunately, if you spend a few minutes setting it up, you can build a single page with all the PHP information you require. Even better, all it needs is a single line of code.
This article will go through the phpinfo() function and why it might be valuable to you. Then we’ll teach you how to make a phpinfo page for your WordPress site with it
An Introduction to the phpinfo() Function
phpinfo() is a PHP function that takes one or more parameters and returns a value. When you run phpinfo(), it will provide you with information about your site’s PHP settings, including:
- The PHP version that your site is using right now.
- Information about your server and its surroundings.
- PHP’s working environment.
- Information about the version of your operating system (OS).
- Paths, including php.ini’s location.
- For PHP configuration settings, there are master and local values.
- Headers on the HTTP protocol.
- PHP’s license.
- Currently used modules and extensions.
When you use the function by itself, it will return all of the information that is available. There are, however, a few factors you may use to limit your access to only the information you wish to see.
These are some of them:
- INFO GENERAL: Shows the configuration line, web server, operating system, and other information.
- INFO CREDITS: Displays a list of PHP developers, modules, and other information.
- The current local and master directives are returned by INFO CONFIGURATION.
- INFO MODULES: All extensions and their settings are shared in this folder.
- INFO ENVIRONMENT: This variable contains all information about the environment variables.
- INFO VARIABLES: Displays all environments, GET, POST, Cookie, and Server variables (EGPCS).
- The PHP License is displayed using the INFO LICENSE variable.
- INFO ALL: Returns all information that is accessible (you can accomplish the same thing by using no parameters).
Making a phpinfo page, which we’ll go over later in this post, is one approach to use the phpinfo() function. It’s worth noting, though, that some of the information listed above may be found without going through the hassle of using that feature
How to Create a phpinfo Page (In 3 Steps)
Creating a phpinfo page is actually pretty straightforward if you have a basic understanding of File Transfer Protocol (FTP) and how to use an FTP client. We’ve broken it down into three simple steps in the sections below.
Step 1: Create and upload a phpinfo.php file to your server.
Open your chosen text editor to begin making this page. Add the following line of code to a new document:
<?php
phpinfo( );
?>
If you want to use one of the parameters listed above, place it here within the parentheses. Save the file as “phpinfo.php” after that. You can give the file another name if you wish (we’ll explain why in Step 3), but it must have the.php extension.
Next, launch FileZilla or similar FTP software and use your FTP credentials to connect to your site’s server. Then, in the public_html folder, upload your new phpinfo.php file:
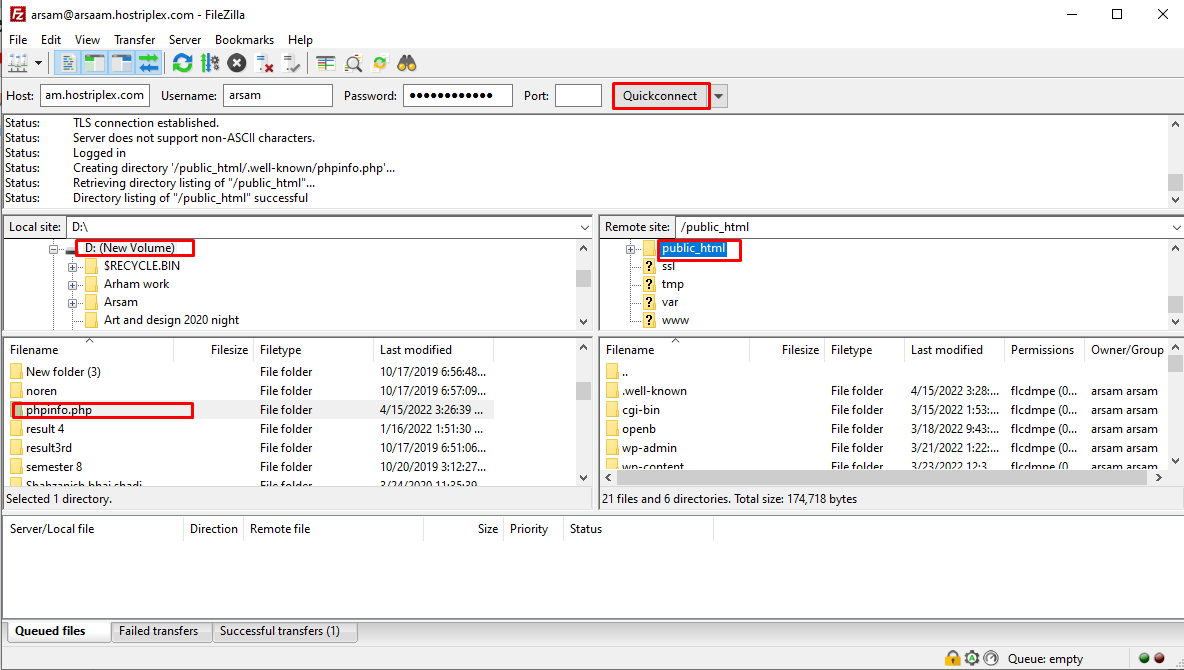
You’ve finished adding the phpinfo page to your website. However, you’ll need to know where to look for the page in order to see it.
Step 2: Open your browser and go to the phpinfo page.
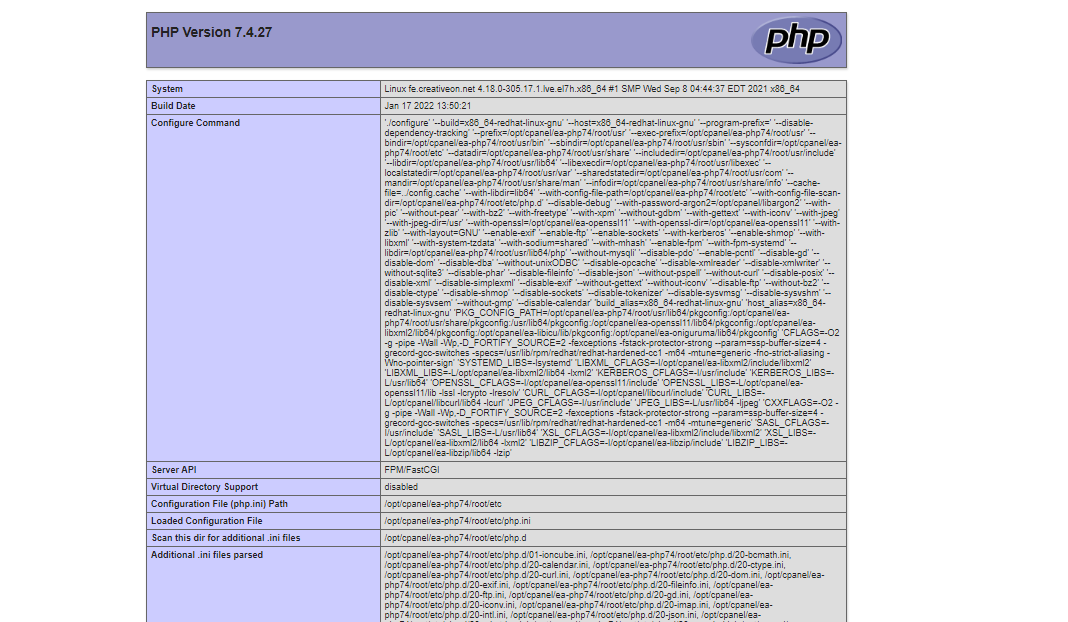
Your phpinfo page will be publicly accessible once published to your server. By attaching /phpinfo.php to the end of your site’s domain, you (and anyone else) can read it in a browser:
This page will be pretty extensive if you didn’t use any parameters and elected to return all of your PHP information. Using your computer’s Find function (CTRL or CMD + F), you can find the particular details you’re looking for:
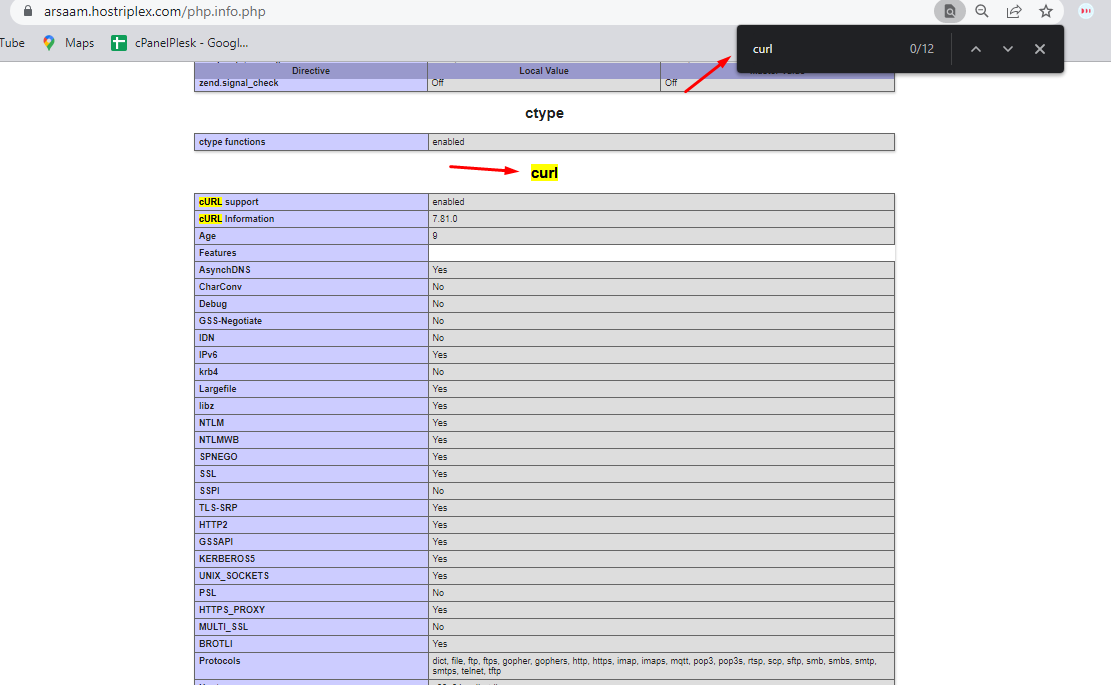
You can now utilize this information to perform any debugging or other actions that are required.
Step 3: Delete or Rename Your phpinfo Page
Because your phpinfo.php file was placed in your public_html folder, it is now publicly viewable, as we mentioned in Step 2. The issue is that some of the data returned by the phpinfo() function is sensitive and might be used by an evil hacker to access your server.
To exploit phpinfo pages, attackers may use bots to look for them. As a result, removing yours is recommended once you’ve finished using it. Return to your FTP client to accomplish this.
Reconnect to your server and navigate to public HTML—select Delete: from the context menu of your phpinfo.php file.

On the other hand, some users choose to rename their phpinfo page to keep it hidden from hackers. Instead of “phpinfo,” you may try a random string of letters and digits. It’s worth noting that this will also change the URL you use to access your phpinfo page.
It means you’ll have to remember the name you give your phpinfo page so you can access it at any time. However, because this isn’t a foolproof method of preventing a security breach, it’s preferable to build the page only when needed and then erase it.
Summary
The phpinfo() function can help you troubleshoot your site by providing useful information. Create a phpinfo page to examine all of your PHP information in your browser, which is a simple way to put it to good use.
- To create and use this page safely, follow these three simple steps:
- Create a file called phpinfo.php and upload it to your server via FTP.
- Using your browser, go to your phpinfo page.
- When you’re finished with your phpinfo page, delete or rename it.
Save time, money, and improve site performance by using:
- Expert WordPress hosting assistance is available 24 hours, seven days a week.
- Integration with Cloudflare Enterprise.
- With 29 data centers worldwide, we can reach a global audience.
- With our built-in Application Performance Monitoring, you can improve your performance.