

There are no of “ready to use” CMS (Content Management Systems) that can be installed with just a few clicks and you can start making/using your website. In this article, I will explain you how to setup one of the most frequently used CMS – WordPress on Apache based CentOS server.
WordPress was actually started as a blogging platform, but gradually it’s upgrdaed from just a blogging platform to a content management system. There are thousands of plugins and themes (both free and paid) that can help you create the site you want.
PREREQUISITE
- A working CentOS server. In this tutorial I am using CentOS 6.8 x64
- A basic skill to use Putty and to navigate through SSH.
- Your server must have necessary software to host a website. In this case are: Apache, PHP5, and MySQL.
- You can also read my previous guide about how to add and setup new site in Apache based CentOS server.
- About 15 minutes of your time and a cup of coffee if you like.
Download WordPress:
Step 1 – Login to your server as a root and follow my previous tutorial about Basic Centos Configurations Before Building A Working Server. This will help you with some basic tweaks to your server.
Step 2 – Now go to your sites root directory which can be
“/var/www/domain.com/public_html” or “/var/www/domain.com/htdocs”.
The root directory can be defined following my previous guide how to add and setup new site in Apache based CentOS server. Use this command:
cd /var/www/domain.com/public_html
Once again, always replace “domain.com” with your actual site’s domain name.
Step 3 – Use wget command to download WordPress into your server. Here it is the command syntax to be used:
wget http://wordpress.org/latest.tar.gz
It should be done within few seconds:

Step 4 – Extract WordPress package file using below command:
tar --strip-components=1 -xvf latest.tar.gz
You can review all the extracted files using the ls command:

Next, you can simply delete the “latest.tar.gz” file:
rm latest.tar.gz
HOW TO INSTALL WORDPRESS
In this section, we will tell you how to install WordPress.
Step 1 – First of all, we have to create new MySQL database and user and grant all privileges for that user for the database.
Login to main MySQL screen at first. In this case I use root:
mysql -u root -p
Step 2 – Once you are in MySQL screen, here you can create new database for your blog. Use this command:
CREATE DATABASE databasename;
change databasename with your own database name. In this example am using cpplblog
Step 3 – You have created new database. Next, you have to create new MySQL username and give full privileges to that new database. This is considered safer than using your root login. Use this command:
GRANT ALL ON databasename.* TO sqluser@localhost IDENTIFIED BY 'password';
change databasename, sqluser and password with your own. For example:
GRANT ALL ON myblog.* TO cppl@localhost IDENTIFIED BY 'pass3456';
That’s it. You must remember: database name, database username and its password. Once done, exit MySQL screen by typing “\q“.
Step 4 – Now edit the “wp-config-sample.php” using either vi or Nano. Assuming you are already in the root directory of your site, you can issue this command:
nano wp-config-sample.php
Or if you are still in very root directory of your server, you can use this command:
nano /var/www/domain.com.com/public_html/wp-config-sample.php
Then edit following lines:
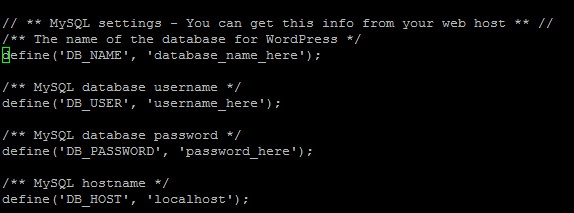
Please replace:
- database_name_here with your newly created database
- username_here with your newly created MySQL user
- password_here with the password of that user.
- You can leave “localhost” as it is in MySQL hostname section, unless you are using remote database.
You can also define following lines:
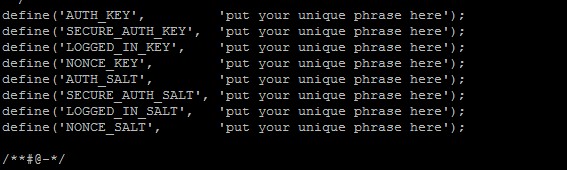
You can Visit this link to generate keys: https://api.wordpress.org/secret-key/1.1/salt/
Once done, exit nano editor.
Step 5 – Rename that sample file then change its permissions:
Command to rename and chnage permissions:
mv wp-config-sample.php wp-config.php
chmod 644 wp-config.php
Step 6 – Now use your browser to launch WordPress installation wizard. Give your domain name and hit enter. Now you’ll see the first page of its Installation Wizard which looks like following:
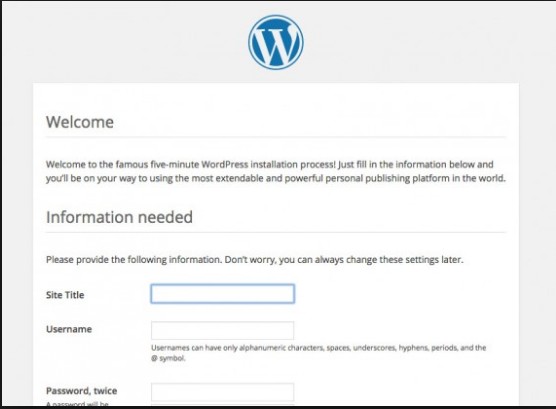
Next, scroll down the page a little bit and you’ll see several fields under “Information Needed” section you have to fill in.
That’s it. Now you can simply login to your newly installed blog at:
http://domain.com/wp-admin/
Now its time to create .htaccess file:
nano .htaccess
Simply enter following lines there:
<IfModule mod_rewrite.c>
RewriteEngine On
RewriteBase /
RewriteRule ^index\.php$ - [L]
RewriteCond %{REQUEST_FILENAME} !-f
RewriteCond %{REQUEST_FILENAME} !-d
RewriteRule . /index.php [L]
</IfModule>
Entering those lines in your .htaccess file helps you to change your blog’s permalink to domain.com/year/month/post-title.
Next, change its permissions to 777:
chmod 777 .htaccess
Do not forget to change its permissions back to 644 once done editing.
That’s all you have to do, also give your opinion below if you experience any issues or to discuss your ideas and experiences.