
If you try to use “yum” to install MySQL on CentOS, you’ll find that it actually installed MariaDB. Generally, MariaDB is a fork of MySql after it went under Oracle’s management.
It’s intended to be a “drop in” alternative, significance that the customer is not expected to see any distinction between the two and all packages that work with MySql will continue to perform together with MariaDB.
However, if you’re enthusiastic about setting up MySql straight from the repos, here’s how you should go about it.
Install the “PHP-PDO” Package
PHP has a special interface for interacting with databases called “PHP PDO”. It brings a lots of benefits including performance and security. It’s setup instantly when you install the package for MySQL support using the following command:
yum install php-mysql
Installing this package will install “php-pdo” as a dependency. Additionaly, this package is also required by the popular web hosting control panel WHMCS in case you ever want to set it up. So it’s a great thing to have in general.
Getting the Repo for MySql
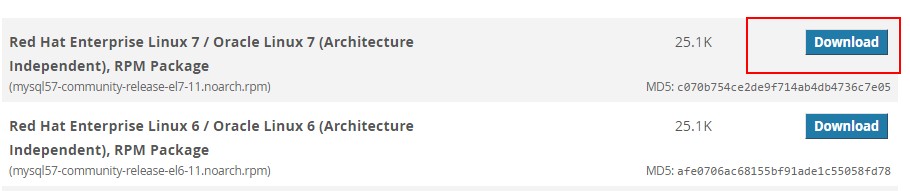
To get the official repo for MySql, visit the following website: https://dev.mysql.com/downloads/repo/yum/. Over here, scroll down and you’ll find a number of download locations for RedHat and Fedora distributions. CentOS is basically just RedHat, so choose the version of the OS that you’re running and click the “Download” link as shown here:
This will take you to a page asking you to sign up for an Oracle account. You can ignore all that and go directly to the link at the bottom saying “No thanks, just start my download”. However, instead of downloading the rpm into our PC, we’re going to copy the URL of the link instead:

In this example, the URL links to https://dev.mysql.com/get/mysql57-community-release-el7-11.noarch.rpm. This is the RPM we’re going to use.
Open up your Linux terminal and run the following commands:
wget https://dev.mysql.com/get/mysql57-community-release-el7-11.noarch.rpm
rpm -ivh mysql-community-release-el7-5.noarch.rpm
Replace the text in bold with the URL you got earlier, and the name of the file that was actually downloaded.
After the installation of this package. We will get two new yum repo related to MySQL:
ls -1 /etc/yum.repos.d/mysql-community*
/etc/yum.repos.d/mysql-community.repo
/etc/yum.repos.d/mysql-community-source.repo
After it’s done, you’re now ready to install MySql server.
Installing MySQL Server
After the repo has been installed, installing MySql is easy. Just run:
yum install mysql-server
This will install the most stable version of MySql.
In addition, it also includes the MySQL client. This allows us to interact with the server, add users, passwords, and all that sort of thing.

You can check the version after installation using the command:
mysql --version
After that start the MySQL daemon service like this:
systemctl start mysqld
Logging in for the First Time
When MySql installed, it generates a temporary random password for root in the following file:
/var/log/mysqld.log
Open it using a text editor like nano. You should see the following line somewhere inside the code: A temporary password is generated…”.
Copy this password – you’ll need it for the first time you log in as root. Then enter the following command:
mysql -u root -p
This will prompt you for the root password you get earlier. Simply enter it and you’re in!
Congratulations! You’ve just logged into the MySql server for the first time on Linux.