
- If you enable Quota System Administration notifications in the Contact Manager interface (WHM >> Home >> Server Contacts >> Contact Manager), the system will notify you when it’s time to reboot and when the quota scan is complete and the quotas are operational.
- Quotas may be broken by CloudLinux™ 7 updates. As a result, you must run the /usr/local/cpanel/scripts/fixquotas script and then remount the file system after each CloudLinux 7 update.
- Servers that use the XFS® filesystem and run the CentOS 7, CloudLinux 7 or 8, AlmaLinux OS 8, or Red Hat® Enterprise Linux® (RHEL) 7 operating systems will require additional procedures if you disable and then enable quotas:
- WHM Interface — To configure quotas, go to WHM >> Home >> Server Configuration >> Initial Quota Setup (WHM >> Home >> Server Configuration >> Initial Quota Setup).
- Remount the file system after running the /usr/local/cpanel/scripts/fixquotas script.
- Using the Command Line (manually) — Read the Red Hat XFS and XFS Quota Management documentation for details on how to manually conduct the activities of the /usr/local/cpanel/scripts/fixquotas script.
This will explain how to check whether the disc space quotas on your system’s devices are appropriately configured.
- Quotas must be enabled for any device with cPanel accounts.
Fix quotas
Perform the following steps to see if your devices are using quotas:
Important: Before doing these operations, you must connect in as the root user via SSH on your machine.
Run the mount command
To get basic information about presently mounted file systems, use the mount command.
The system displays information for all of its mounted file systems when you use this command without any arguments.
Note: Quota-enabled entries have the usrquota variable.
The /dev/mapper/VolGroup00-LogVol00 device employs quotas, as shown in the following example:
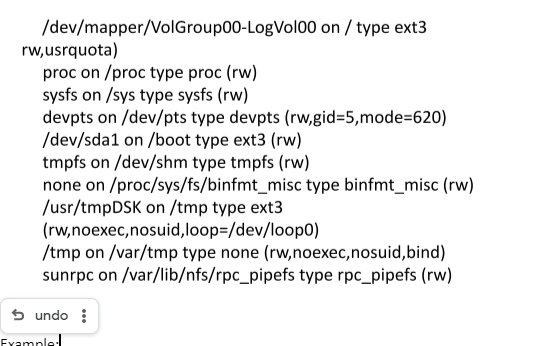
Note: The mount command documentation is a good place to start if you want to learn more about it.
Examine the contents of the fstab file
Within a system, the file system table (fstab) file maps devices to their appropriate mount points.
The contents of the fstab file will look something like this:
Keep in mind that entries with the usrquota variable are quota-enabled.

How to enable quotas
After you’ve determined which devices don’t use quotas, follow the steps below to enable quotas for the devices you want.
Run the initquotas script
Run the /usr/local/cpanel/scripts/initquotas script to enable quotas on a device. The usrquota string is added to the Options column of the /etc/fstab file by this script.
Verify that you enabled quota files
Confirm that the quota files exist in the root directory (/) and that each file is greater than 0 bytes after running the /usr/local/cpanel/scripts/initquotas script.
Use the ls command with a wildcard character. Consider the following scenario:
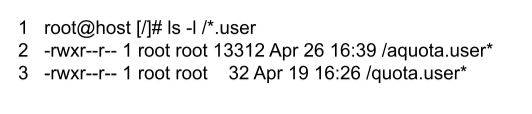
The ls command is used in the preceding example to list the contents of the root directory (/).
The -l switch tells ls to display its output in a long listing format. This format displays the following information:
The permissions of the file.
- Which user is the owner of the file?
- Which organization owns the file.?
- In bytes, What is the file’s size?
- On which date the file was last modified?
If these files are missing, rerun the /usr/local/cpanel/scripts/initquotas script to generate them.
If these files exist but quotas are not working, delete them and then execute the scripts /usr/local/cpanel/scripts/initquotas or /usr/local/cpanel/scripts/fixquotas.
Ensure quotas report on the system
To validate that quotas have been activated on the device, run the following command:

This command displays all of the file systems listed in the /etc/mtab file, along with their reads and writes permissions and quota options.
What if my quotas still do not function?
If you continue to have issues, take one of the following steps:
In the System section of WHM’s Tweak Settings interface (WHM >> Home >> Server Configuration >> Tweak Settings), disable the Cache disc quota information setting.
In the /var/cpanel/cpanel.config file, set the disable quota cache parameter to 0.
If you’re still having trouble with quotas, submit a support ticket.